


When cold winds whirl in, it’s time to tuck your RV in for a long winter’s nap. If you live in a region where freezing temperatures and precipitation occur, winterization may be a chore you dread, but it’s worth the effort to protect your RV. The time you put into safely storing your RV for the winter will pay off when spring blossoms.
This complete guide to storing your RV for the winter will explain everything you need to know about the importance of proper storage, available storage options, and the primary winterization steps.
Why Proper Winter RV Storage Matters
While water lines may be the first thing that comes to mind when you think of winterizing, there are actually multiple elements of your RV that require consideration. Winter hits your RV with two perils: cold temperatures and prolonged inactivity.
Here are a few risks your RV may encounter during the winter, especially if improperly stored:
- Freeze damage: Cold temperatures pose a major threat to your water lines, which can burst if ice expands in them. Don’t overlook the liquids in any foods or hygiene items left in your RV, as these can explode and attract pests.
- Mold: During the winter months, temperature fluctuations can cause condensation to build in your RV. Plus, any undetected water leaks may allow moisture to build up. If you aren’t regularly checking your RV during months of inactivity, mold can grow due to poor ventilation.
- Pests: During the winter, mice and insects may be looking to get inside out of the cold like everyone else, and, unfortunately, your RV is an appealing habitat, especially if you leave food and hygiene items stored inside.
- Battery degradation: You may not think about your RV battery very often, but winter is the time to think about it. Your battery cannot sit for months without charging, as parasitic loads, self-discharge, and cold temperatures drain it, which can lead to long-term damage.
- Tire damage: Months of inactivity and continual temperature and moisture fluctuations are harmful to your tires, causing deterioration.
Choosing the Right Storage Option
Now that you understand WHY you need to properly store your RV for the winter, let’s look at WHERE to store it. Here are some aspects to consider about each of the most popular storage options:
Storage at Home / On Property: For many RVers, the most convenient storage spot is at home. This is also the cheapest option, and you can easily check on your rig. However, not everyone has the space, and some homeowner's associations ban long-term parking. Also, unless your RV is small enough to fit inside your garage, your rig will be exposed to the elements, including cold temperatures and direct sunlight.
Indoor Versus Outdoor Storage: You may consider storing your RV off-site at a storage facility. You will pay a fee, likely based on the size of your RV, your location, and the type of storage. Outdoor facilities are usually less costly, while indoor facilities offer more security and protection. Some outdoor spots offer parking under a rooftop. If you live in a region that receives heavy winter precipitation, this can protect your RV from snow and ice accumulating on the roof.
Climate-Controlled Facilities: For the best protection, look for a climate-controlled indoor storage facility. These locations regulate both the temperature and humidity, preventing damage from corrosion, mold, precipitation, and sunlight. While this is likely the most expensive option, it can save you from costly repairs down the line.
Winterizing Plumbing and Water Systems
If you do nothing else for your RV for winter storage, take the proper steps to protect your plumbing and water systems. When freezing temperatures and water combine, you can end up with expensive repairs to make in the spring.
To find the exact steps for your model, consult your owner’s manual or look online for helpful video demonstrations. If you are unable to do the winterization yourself, many service centers or mobile RV repair companies will do it for you for a fee.
If you want to DIY it, here are the basic steps:
- If you have a backflush for your black tank, use it to clean the tank in order to reduce odors while in storage. If you do not have a backflush, consider dumping or spraying clean water in your black tank as it is draining to flush it out as much as possible.
- Thoroughly drain the fresh, gray, and black water tanks. In addition to the tank valves, open the low-point drains under your RV.
- Drain your water heater tank. This step is sometimes easy to overlook.
- In order to prepare your water lines for antifreeze, follow the proper steps to bypass your water heater.
- Finally, run RV‐safe antifreeze through your water lines. Pour extra antifreeze into your sink and shower p-traps and into your toilet tank to help protect the seals.
Battery and Electrical System Care
Here are some tips for preparing your battery and electrical system for winter storage:
- Decide whether to remove your batteries or keep them in your RV. If you want to leave them in your RV, you either need to use a battery kill switch or keep the rig plugged in, protecting the battery from parasitic drains.
- If your lead-acid battery is removed or disconnected with a kill switch, use a battery maintainer or trickle charge to prevent self-discharge.
- Lithium batteries require different care. Charge them to around 50 to 80 percent, as they shouldn’t be stored at 100 percent. Then, periodically check to see if the charge has dropped significantly. When properly stored, the charge should only drop approximately two or three percent per month. If it drops below 50 percent, recharge the battery.
- If you have a motorhome with a generator, periodically run it. Many manufacturers recommend running it at least a couple of hours per month to prevent fuel deterioration and other damage.
Interior Protection and Pest Prevention
Now, get your interior clean and ready for storage. Here are some tips:
- Clean out all food and perishables.
- Don’t overlook toiletries that could freeze or attract pests.
- Seal any vents and cracks.
- Use pest deterrents for mice and insects.
- Use moisture absorbers to prevent mold.
Preparing the Exterior for Winter
The exterior of your RV will be most exposed to the elements. Here are some tips to help protect it:
- Do a thorough inspection of the roof, seals, and caulking. You don’t want to leave any possible entry points for water.
- Thoroughly clean your RV to prevent damage to your exterior from dirt and chemicals left on it for months.
- Next, properly inflate your tires, and park your RV in a way that protects them. It’s best to level your load so your tires have equal weight to bear while parked for a lengthy period. Using your RV jacks can also reduce the load. Park on a solid surface or jack pads to reduce the effects of ground-level moisture.
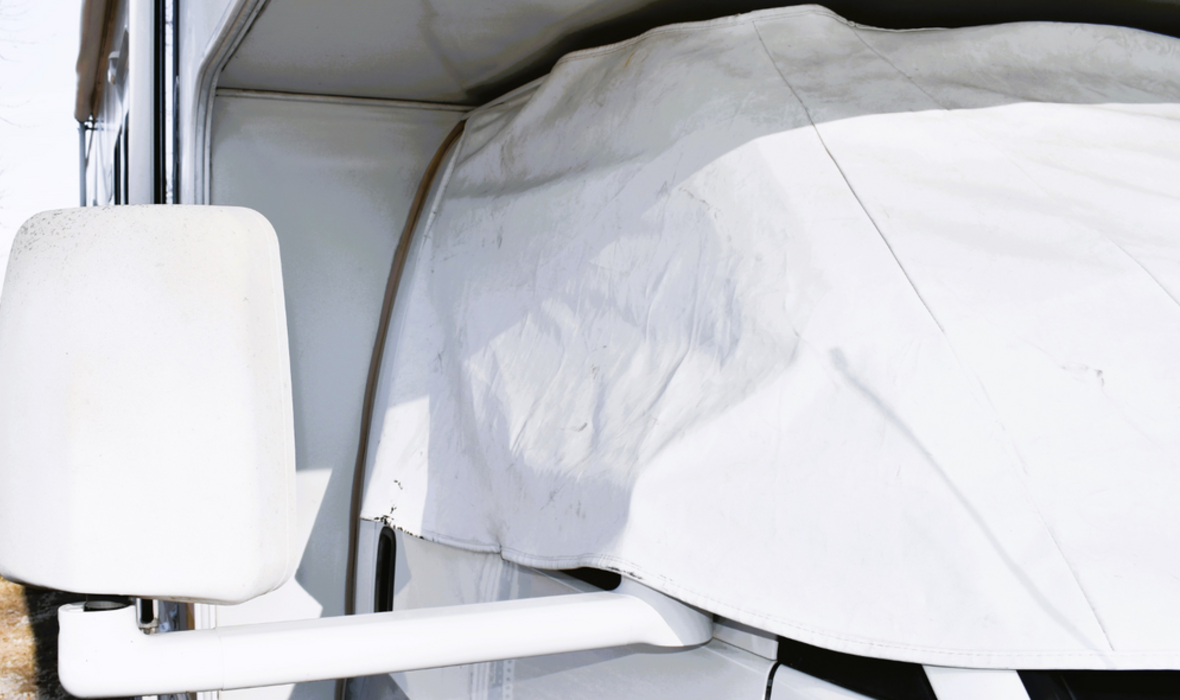
- Finally, you should apply any external covers you’ll be using for extra protection from the elements. If parking outside, consider using a UV-protected and mildew-resistant RV cover. If you aren’t using a full cover, you may wish to cover the tires, at a minimum. Also, some RVers take the extra step of using an RV skirting for optimum protection of the underbelly, including your plumbing and electrical components.
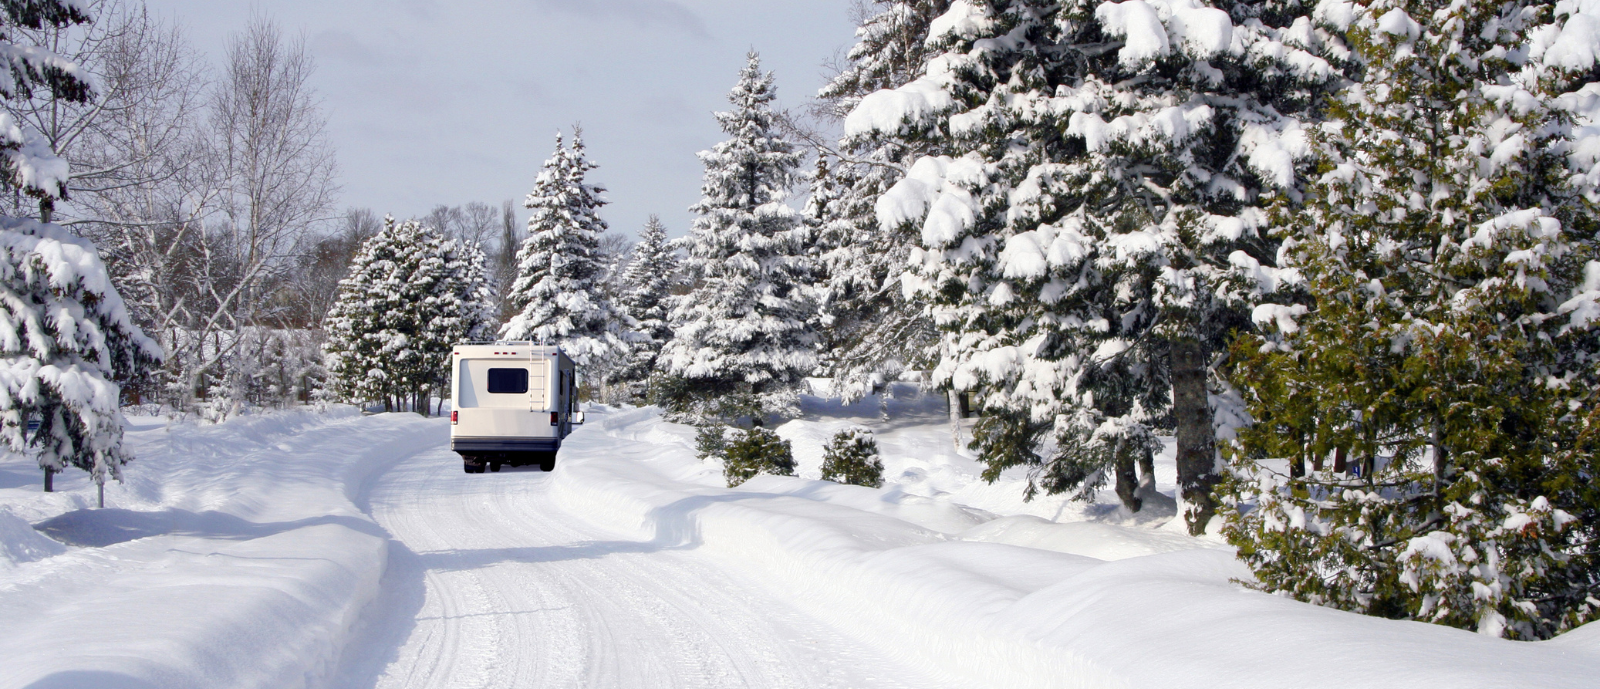
Preparing for Snow, Ice, and Extreme Weather Events
Preparing your RV for winter weather varies greatly depending on where you live, as some locations barely get below freezing, while others receive several feet of snow over the winter. If you’ve recently moved to a new region, check into the average and extreme ends of temperatures and moisture.
- Consider snow load concerns if your location generally receives several inches at a time or if snow stays put for weeks or months on end. The weight of the snow can be too much for your roof to bear, especially if you receive more than several inches or have wet, heavy snow.
- Ice is another concern in two ways. First, snow packed with ice adds to the weight your roof must bear. But, just as importantly, water that makes its way into cracks and seams can freeze and expand if you live in an area that rises and drops below freezing frequently.
- Wind is an overlooked concern. If you live in an area with extreme winds, you may want to anchor the RV for additional stability.
- If your RV is stored outside, consider the drainage around your storage site. Ground moisture can damage tires.
Maintenance During Storage
Once you get your RV packed away for the winter, your maintenance isn’t over.
- Perform periodic checks on the seals, tire pressure, and battery status.
- If you receive heavy snows, try to clear the RV roof to reduce the snow load.
- Check the cover for cracks, tears, and rubbing to ensure it stays in good shape.
Gear for Storing Your RV
If storing your RV for the winter is in your near future, this gear can help keep your rig safe and in place until it’s time to camp again.
- RV cover: Whether you’re driving a motorhome or towing a travel trailer, a cover is your first line of defense from harsh weather, pests, and debris. This should be designed to fit the size and shape of your RV and withstand exposure to rain, snow, freezing temperatures, and other elements. Check out ADCO’s lineup of RV covers to explore various options.
- RV levelers and wheel chocks: Wheel chocks should be used to keep your RV in place while in storage. These can be especially important if your rig is parked on a slanted driveway or yard. Explore the options from Andersen Hitches.
- RV jack pads: If you’re storing your RV outside on a soft surface, consider using jack pads to prevent your RV from sinking into the ground, where it can become unlevel. Camco has many options.
- RV skirting: Some RV owners opt to skirt their rigs during storage to provide added insulation and protection from freezing temperatures and winter weather. Skirting can also help deter pests from sneaking into the underbelly of your rig. A number of manufacturers offer custom-made options for the perfect fit.
Getting Ready for Spring (De‐winterizing)
Eventually, winter will end! You will get to de-winterize your RV and prepare for your first outing. Before you do so, you’ll basically go through the steps above in reverse. You’ll remove all covers, run fresh water through the lines, check your tire pressure, and reinstall your fully charged battery.
Before your first trip, do a thorough systems check to ensure your appliances, electrical system, plumbing, and water system are all in proper working order.
RV Winter Storage FAQs
- When should I store my RV for the winter? This will depend greatly on your region and the weather forecast. As a general rule, most RVers winterize when temperatures are at or below freezing for around 24 hours.
- Can I use my RV after I’ve stored it for the winter? Yes! Some campers love the solitude and scenery of winter camping. You can either de-winterize for a trip and then re-winterize upon your return, or you may leave your RV winterized and use everything but the plumbing and water systems.
- What if we get freezing temperatures and I haven’t winterized my RV yet? If you face an unexpected short burst of freezing temperatures before you’ve had a chance to winterize, consider running your RV’s interior heater. Always unhook exterior water supplies to prevent ice from building up (or use a heated water hose).
RV Winter Storage Checklist
Purchase or gather your gear, which may include:
- Owner’s manual
- RV antifreeze (NOTE: Do not use regular antifreeze)
- RV cover, tire covers, and/or skirting
- RV chocks and levelers
- RV jack pads
- Pest/insect deterrents
- Moisture absorbers, if needed
- Cleaning supplies
- Caulk and sealant to repair any cracks
- Wash the exterior
- Check the exterior roof, seals, and calking
- Inspect the underbelly
- Properly inflate your tires
- Park and level the RV; consider using jacks to lessen the load
- Anchor the RV if you’ll receive high winds while stored
- Clean the interior to remove food and hygiene items
- Check interior seals; ensure windows are tightly closed
- Place pest and insect deterrents and moisture absorbers in the interior
- Remove your propane tanks and batteries (if not plugged in)
- Place battery on tender (if battery is not being charged through the RV)
- Complete winterization steps of plumbing and water system
- Place covers on RV and/or tires; put skirting in place, if using